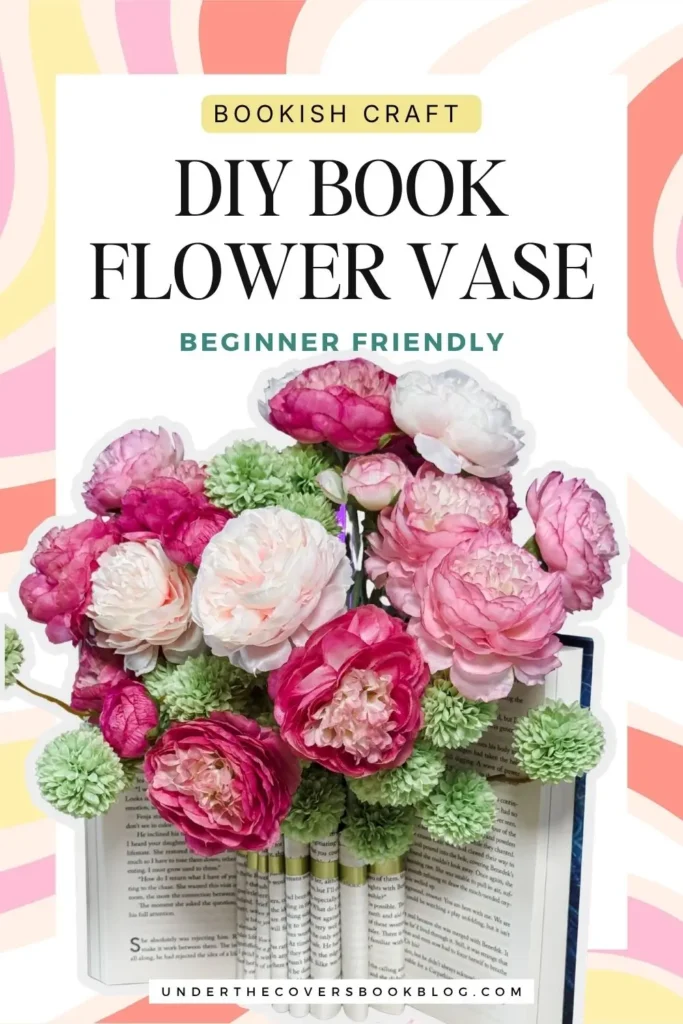
DIY Book Flower Vase Tutorial: The Easiest Bookish Mother’s Day Gift
Make an easy DIY book flower vase with a hardcover book, faux flowers, and tape runner. A simple beginner friendly bookish craft perfect for Mother’s Day gift, bookworm gifts, or just pretty shelf decor.
I love a bookish craft that looks way fancier than it actually is. This DIY book flower vase is exactly that. It looks like something that took a whole afternoon, a craft table, and a level of patience I personally do not have anymore. But really? It’s just a hardcover book, faux flowers, a tape runner, and a little cutting.
That’s it.
No hot glue gun. No complicated tools. No advanced crafting skills. No need to be the kind of person who owns seventeen bins of craft supplies labeled by season.
And the best part? This whole project took me about 40 minutes from start to finish, and that includes gathering the supplies. So this is very much a “do it while watching TV” kind of craft and not a whole day project.
This is a super easy DIY book flower vase that makes such a pretty gift, especially for Mother’s Day. I personally gave this one to my mom and got a ton of “OMG I looooove it” from her. It’s also perfect for your own bookshelf, reading nook, desk, or anywhere you want a little bookish drama without adding yet another stack of books.
This post contains affiliate links. That means we receive a small commission at no cost to you from any purchases you make through these links.
Why This DIY Book Flower Vase Makes a Great Gift
This is such a cute gift for any bookworm in your life. But I would even venture to say it’s perfect even if they’re not bookworm. Think birthdays, Mother’s Day, Christmas, graduation gift. Any special occasion because it feels personal without being overly complicated.
You can choose a hardcover book that fits the person you’re making it for, then pick flowers in their favorite colors. I chose pinks, whites, and greens from the TikTok shop for a pop of color because I made this one for my mom, but you could easily do brighter colors, neutrals, purple tones, goth vibes or whatever matches their style.
It’s also a great gift for:
your mom
your mother-in-law
a grandma
a teacher
a book club friend
a romance reader
a friend who loves pretty shelf decor
yourself, because honestly, we need this one our shelf too.
My favorite thing about it? Anyone can do this. Truly, you don’t need to be crafty for this to look like you are.
Supplies You’ll Need for the DIY Book Flower Vase
You only need a few things for this project:
- A hardcover book of your choice
- Faux flowers
- Glue tape or a tape runner
- An X-Acto knife
- A marker or pen
- A ruler
- A piece of cardboard
That’s it. And you may even have most of these things laying around your house right now.
A Quick Note About Choosing the Book
You need a hardcover book because that’s how this will stand up. While you can use a copy of your favorite book, if you want this to reflect a particular book choice. But I actually recommend this is perfect for an old book, thrifted book, damaged book, or a book you were ready to donate to the library. If you don’t have a candidate, a library book sale or thrift store find would be great.
Personally, I remove the book sleeve from the book as well, so there’s less moving parts for the structure, but if you are using a book that means something, maybe you want to leave that on.
If you are doing this as a Mother’s Day gift, you could even use a book that has sentimental value, as long as everyone involved is prepared for the emotional part of cutting into it.
Step 1: Find the Middle of the Book
Open your book around the middle. You can actually count if you want to be precise. I just eyeball it. Just know this is a very forgiving craft.
Once you have the middle open, count 12 pages to one side and 12 pages to the other side. Mark that with something so you know where is your stopping point.
You end up with 24 pages right in the “middle” that you will be working with.
Step 2: Mark Half the Page Height
With the book open right in the middle, take your ruler and mark with a pen about the halfway point (vertically) on the page.
Do that in two points on the page and then draw a line across so you know where to cut. No need to be perfect. This will be covered with flowers after anyway.
Do this on both sides of the open book.
Would you like to save this?
Step 3: Cut Off the Top Half of the 24 Pages
Slide your cardboard under the 12th page and place it under the line you marked. This will protect the rest of the pages from getting sliced. Then using your X-Acto knife, carefully cut along the line you made. Pushing down so that all 12 pages are cut, you will need a couple of passes with the knife. Again, no need to be super perfect. Now you can either tear away the top or cut again close to the center line of that top part if you want a cleaner cut.
You’re cutting away the top portion of the page, leaving the bottom half attached to the book.
Do this for the 12 pages on one side of the middle, then repeat the whole process on the other side. Once you’re done, you should have 24 pages in the center of the book with the top half removed.
Step 4: Make Page Bundles
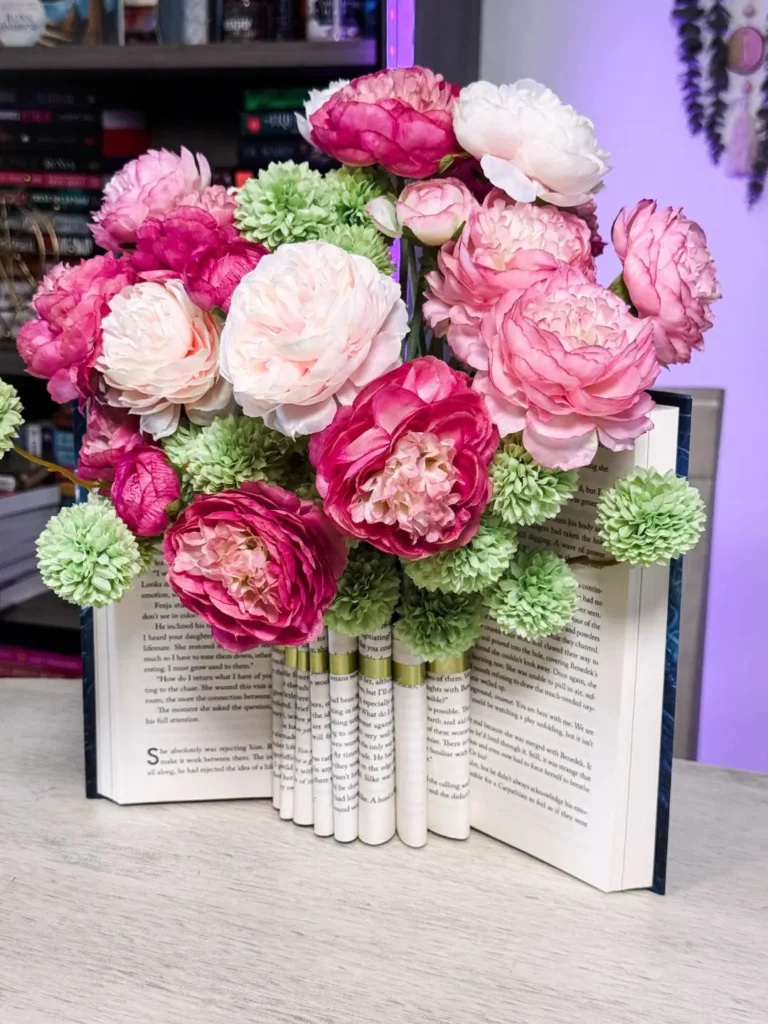
Starting on one side, count 3 of the half pages. Use your tape runner vertically down the side of the half page to stick those 3 pages together into one bundle. Repeat this until all the half pages are grouped into bundles of 3 pages. You should end up with 8 total taped bundles.
So instead of lots of loose little pages flopping around, you now have sturdier sections that will become the flower pockets. Already looking crafty. We love to see it.
Step 5: Decorate the Visible Side (Optional)
While this is optional, I think it can give the finished DIY book flower vase a more personal touch. The back side of those paper bundles will be visible, so decorate to your hearts content.
Some ideas:
- draw with a marker
- add a strip(s) of washi tape (this is what I did with gold wash)
- use watercolor to make the whole half page pretty and colorful
- keep it plain and simple
This may seem like a tiny detail, but it makes the whole thing feel more finished. It’s also where you can match the vibe of the gift or really capture the personality.
Step 6: Fold Each Bundle Into a Pocket
Now take one of your taped bundles. Use the tape runner again and run a strip vertically along the side. Then gently fold the bundle inward so it attaches to the inside part of that same half page area. You’re basically creating a little loop or pocket. Repeat this for each bundle.
Once they’re all folded and taped, you’ll have a row of paper pockets in the center of the book. These are what will hold your faux flowers.
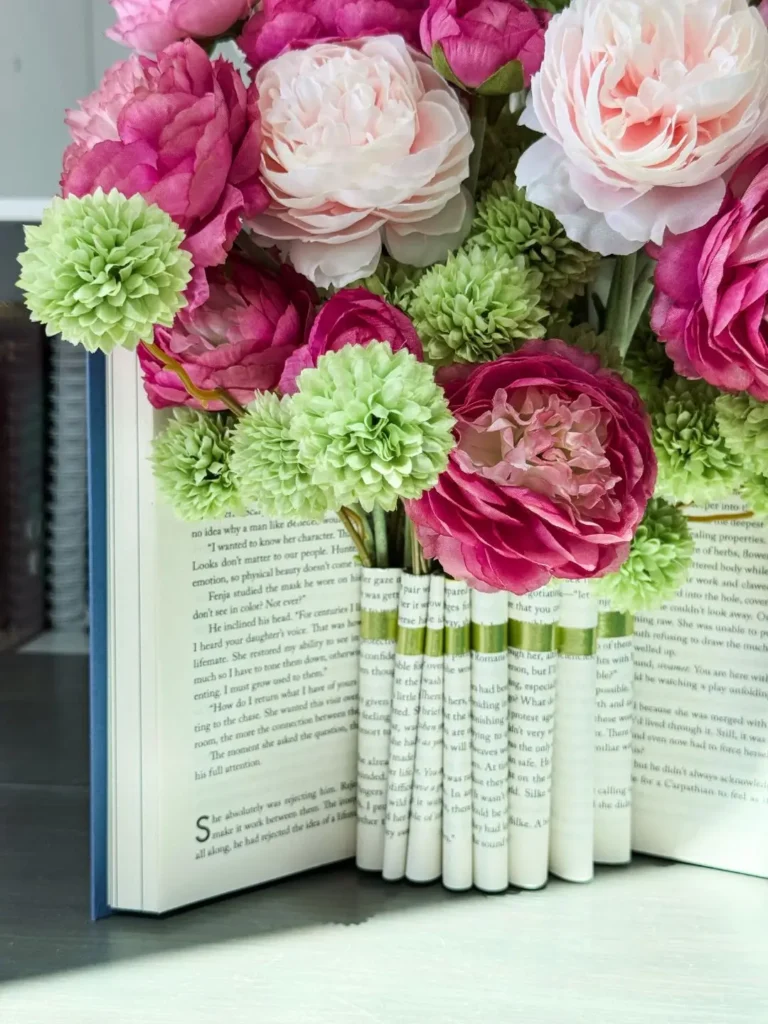
Step 7: Add the Faux Flowers
Now all that’s left is to fill the pockets with the pretty flowers. Depending on the flowers you got, you may need to trim them. I like to start with the bigger flowers first and then add the filler smaller flowers and greenery. You can make the arrangement as full or as simple as you want. I like a fuller look because it hides any imperfections of the craft and it just looks lush.
Step 8: Fluff, Adjust, and Display
Once the flowers are in place, fluff them out and adjust the stems until it looks exactly how you want it. And that’s it. You made a DIY book flower vase. No hot glue. No crafting crisis.
Tips to Make This Even Easier
- Don’t worry about finding the perfect middle of the book. Close enough is fine.
- Use cardboard under your cutting area every time.
- The cut doesn’t have to be perfect. If it bothers you, after you have the bundles ready, take some washi tape and tape that closing both sides of the top (or bottom too if you want) so the edges are more finished.
- Pick faux flowers with thinner stems because they’re easier to slide into the pockets.
- Use fuller flowers if you want to hide any uneven cuts. Especially that ripped middle if you didn’t stop to cut that.
- Decorate the back side of the page bundles before folding them into pockets. It’s easier that way.
- And most importantly, don’t overthink it. This craft is supposed to be simple. Don’t complicate it.
Final Thoughts
This DIY book flower vase is one of those crafts that looks thoughtful and impressive but is actually very beginner friendly. It’s perfect for a handmade Mother’s Day gift, a gift for the book lover in your life, or a pretty little shelf upgrade for your own reading space or desk.
I hope this gave you the confidence to think you can do this. Because honestly? You can.
Pin It for Later